UVCal
UVCal objects hold all of the metadata and data required to work with calibration
solutions for interferometric data sets. Calibration solutions are tied to antennas
rather than baselines. There are many different kinds of calibration solutions, UVCal
has support for many of the most common ones, but this flexibility leads to some
complexity in the definition of UVCal objects. The cal_type attribute on UVCal
objects indicates whether calibration solutions are “gain” (a complex number per
antenna, polarization and frequency) or “delay” (a real number per antenna and
polarization) type solutions. The cal_style attribute indicates whether the solution
came from a “sky” or “redundant” style of calibration solution. Some metadata items only
apply to one cal_type or cal_style.
Starting in version 3.0, metadata that is associated with the telescope (as
opposed to the data set) is stored in a pyuvdata.Telescope object as
the telescope attribute on a UVCal object. This includes metadata related
to the telescope location, antenna names, numbers and positions as well as other
telescope metadata.
The antennas are described in two ways: with antenna numbers and antenna names. The
antenna numbers should not be confused with indices – they are not required to start
at zero or to be contiguous, although it is not uncommon for some telescopes to number
them like indices. On UVCal objects, the names and numbers are held in the
telescope.antenna_names and telescope.antenna_numbers attributes
respectively. These are arranged in the same order so that an antenna number
can be used to identify an antenna name and vice versa.
Note that not all the antennas listed in telescope.antenna_numbers and
telescope.antenna_names are guaranteed to have calibration solutions
associated with them in the gain_array (or delay_array for delay type
solutions). The antenna numbers associated with each calibration solution is
held in the ant_array attribute (which has the same length as the
gain_array or delay_array along the antenna axis).
Calibration solutions can be described as either applying at a particular time (when
calibrations were calculated for each integration), in which case the time_array
attribute will be set, or over a time range (when one solution was calculated over a
range of integration times), in which case the time_range attribute will be set.
Only one of time_array and time_range should be set on a UVCal object. If set,
the time_range attribute should have shape (Ntimes, 2) where the second axis
gives the beginning and end of the time range. The local sidereal times follow a similar
pattern, UVCal objects should have either an lst_array or an lst_range attribute
set.
Similarly, calibration solutions can be described as either applying at specific
frequencies or across a frequency band. This choice is encoded in the boolean
attribute wide_band on UVCal objects. Delay style calibrations are always
wide band, while gain style calibration solutions are most commonly per frequency
but can also be represented as wide band in some cases. Per-frequency calibration
solutions will have freq_array and channel_width attributes set on the
object, each with length Nfreqs. The frequencies can each be assigned to a
spectral window in a similar way as on UVData objects, with the flex_spw_id_array
attribute giving the mapping from frequencies to spectral windows.
Wide band calibration solutions will not have a freq_array defined and will
have Nfreqs set to 1. Instead they will have a freq_range attribute with
shape (Nspws, 2) that specifies the frequency range each solution is valid for
where the second axis gives the beginning and end of the frequency range.
The second axis of the gain_array or delay_array is always along the
frequency axis, with a length of Nfreqs for per-frequency solutions or Nspws
for wide band solutions.
Generating calibration solutions typically requires choosing a convention concerning how
polarized sky emission is mapped to the instrumental polarizations. For
linear polarizations XX and YY, the stokes I sky emission can be mapped to
I = (XX + YY)/2 (the avg convention) or I = XX + YY (the sum
convention). This choice is generally encoded in the sky model to which the visibilities
are calibrated. Different tools and simulators make different choices, generally following
a standard choice for the field. For example, tasks in CASA (e.g., tclean) and
MIRIAD, along with WSClean, all assume the avg convention. FHD and the HERA
analysis stack use the sum convention. In pyuvdata either of these choices are
OK, but the
choice should be recorded as the pol_convention parameter in both UVCal and
UVData objects. Since the pol_convention has always (at least implicitly) been
chosen for calibration solutions, we suggest always specifying this parameter on the
UVCal object (though we do not enforce this, for backwards compatibility reasons).
Only calibrated UVData objects make sense to have the pol_convention specified.
To learn more about this parameter and how pyuvdata deals with it, please see the
section below UVCal: Calibrating UVData.
For most users, the convenience methods for quick data access (see
UVCal: Quick data access) are the easiest way to get data for particular antennas.
Those methods take the antenna numbers (i.e. numbers listed in telescope.antenna_numbers)
as inputs.
Note
Our tutorial uses small data files for examples. The data files are hosted in
the RASG datasets repo,
organized by data type and telescope. In the tutorials this data is downloaded
and cached using the pooch package via the pyuvdata.datasets.fetch_data
function. To run those commands you’ll need to have pooch installed (you can
install it yourself or use pip install pyuvdata[tutorial]). Note that pooch
will download the file the first time you ask for it and save it in a cache
folder, subsequent calls to fetch that data will not re-download it.
UVCal: Instantiating a UVCal object from a file (i.e. reading data)
Use the pyuvdata.UVCal.from_file() to instantiate a UVCal object from
data in a file (alternatively you can create an object with no inputs and then
call the pyuvdata.UVCal.read() method). Most file types require a single
file or folder to instantiate an object, FHD data sets require the user to
specify multiple files for each dataset.
pyuvdata can also be used to create a UVCal object from arrays in memory
(see UVCal: Instantiating from arrays in memory) or from a UVData object (see UVCal: Initializing from a UVData object) and to read
in multiple datasets (files) into a single object (see d) Reading multiple files.).
Note
Reading or writing CASA Measurement sets requires python-casacore to be installed (see the readme for details). Reading or writing Miriad files is not supported on Windows.
a) Instantiate an object from a single file or folder
CalFITS and calh5 and datasets are stored in a single file. CASA Measurement Sets are stored in structured folders, for this file type pass in the folder name.
from pyuvdata import UVCal
from pyuvdata.datasets import fetch_data

filename = fetch_data("hera_omnical2")
uvc = UVCal.from_file(filename)
b) Instantiate an object from an FHD dataset
When reading FHD datasets, we need to pass in several auxiliary files.
import os
from pyuvdata import UVCal
from pyuvdata.datasets import fetch_data

# Set up the files we need
fhd_path = fetch_data("mwa_fhd_cal")
obs_testfile = os.path.join(fhd_path, "metadata/1061316296_obs.sav")
cal_testfile = os.path.join(fhd_path, "calibration/1061316296_cal.sav")
settings_testfile = os.path.join(fhd_path, "metadata/1061316296_settings.txt")
layout_testfile = os.path.join(fhd_path, "metadata/1061316296_layout.sav")

fhd_uvc = UVCal.from_file(
    cal_testfile,
    obs_file=obs_testfile,
    settings_file=settings_testfile,
    layout_file=layout_testfile,
)
UVCal: Writing UVCal objects to disk
pyuvdata can write UVCal objects to CalFITS, CASA Measurement Set and Calh5 files.
Each of these has an associated write method:
pyuvdata.UVCal.write_calfits(), pyuvdata.UVCal.write_ms_cal(),
pyuvdata.UVCal.write_calh5(), which only require a filename (or folder name
for CASA Measurement Sets) to write the data to.
pyuvdata can be used to simply convert data from one file type to another by reading in one file type and writing out another.
import os
from pyuvdata import UVCal
from pyuvdata.datasets import fetch_data

ms_file =  filename = fetch_data("sma_amp_gcal")
# Instantiate an object from a measurement set
uvc = UVCal.from_file(ms_file)

# Write the data out to a calh5 file
write_file = os.path.join(".", "tutorial.calh5")
uvc.write_calh5(write_file)
UVCal: Quick data access
Methods for quick data access, similar to those on pyuvdata.UVData
(UVData: Quick data access), are available for pyuvdata.UVCal.
There are three specific methods that will return numpy arrays:
pyuvdata.UVCal.get_gains(), pyuvdata.UVCal.get_flags(), and
pyuvdata.UVCal.get_quality(). When possible, these methods will return numpy
MemoryView objects, which is relatively fast and adds minimal memory overhead.
a) Data for a single antenna and instrumental polarization
from pyuvdata import UVCal
from pyuvdata.datasets import fetch_data

filename = fetch_data("hera_omnical1")
uvc = UVCal.from_file(filename)
gain = uvc.get_gains(9, "Jxx")  # gain for ant=9, pol="Jxx"

# One can equivalently make any of these calls with the input wrapped in a tuple.
gain = uvc.get_gains((9, "Jxx"))

# If no polarization is fed, then all polarizations are returned
gain = uvc.get_gains(9)

# One can also request flags and quality arrays in a similar manner
flags = uvc.get_flags(9, "Jxx")
quals = uvc.get_quality(9, "Jxx")
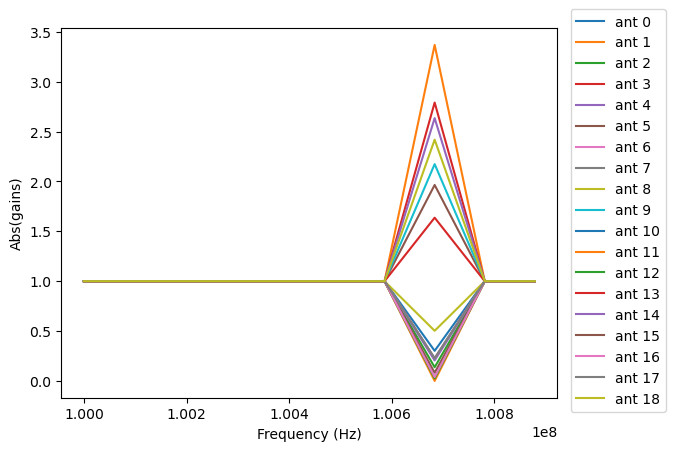
UVCal: Plotting
Making a simple gain plot.
Note: there is now support for reading in only part of a file for many file types (see UVCal: Working with large files), so you need not read in the entire file to plot one time.
import matplotlib.pyplot as plt
import numpy as np
from pyuvdata import UVCal
from pyuvdata.datasets import fetch_data

filename = fetch_data("hera_omnical2")
uvc = UVCal.from_file(filename)

# plot abs of all gains for first time and first jones component.
fig, ax = plt.subplots(1, 1)
for ant in range(uvc.Nants_data):
    _ = ax.plot(uvc.freq_array.flatten(), np.abs(uvc.gain_array[ant, :, 0, 0]), label=f"ant {ant}")
    _ = ax.set_xlabel("Frequency (Hz)")
    _ = ax.set_ylabel("Abs(gains)")
    _ = fig.legend(bbox_to_anchor=(1.08, 0.5), loc="outside center right")
plt.show() # doctest: +SKIP
plt.savefig("Images/abs_gains.png", bbox_inches="tight")
plt.clf()
UVCal: Calibrating UVData
Calibration solutions in a pyuvdata.UVCal object can be applied to a
pyuvdata.UVData object using the pyuvdata.utils.uvcalibrate() function.
Generating calibration solutions typically requires choosing a convention concerning how
polarized sky emission is mapped to the instrumental polarizations. For
linear polarizations XX and YY, the stokes I sky emission can be mapped to
I = (XX + YY)/2 (the avg convention) or I = XX + YY (the sum
convention). This choice is generally encoded in the sky model to which the visibilities
are calibrated. Different tools and simulators make different choices, generally following
a standard choice for the field. When calibrating a UVData object with a UVCal
object using pyuvdata.utils.uvcalibrate(), it is required to specify this
convention. At this time, the convention can be specified either on the UVCal object
itself, or as a parameter to pyuvdata.utils.uvcalibrate(). The chosen pol_convention
will then be applied to and stored on the resulting UVData object.
There are a few non-trivial combinations of parameters concerning the pol_convention
that should be noted:
There are two parameters to
pyuvdata.utils.uvcalibrate()that specify how the convention should be handled:uvd_pol_conventionanduvc_pol_convention, and these act differently depending on whetherundois True or False. Theuvc_pol_conventionis only ever meant to specify what convention theUVCalobject actually uses, and is therefore unnecessary ifUVCal.pol_conventionis specified (regardless of whether calibrating or uncalibrating). On the other hand, theuvd_pol_conventionspecifies the desired convention on the resultingUVDataobject if calibrating, and otherwise specifies the actual convention on theUVDataobject (if uncalibrating, and this convention is not already specified on the object itself).Regardless of the value of
undo, the convention that is inferred for the calibration solutions is determined as follows:If neither
uvc_pol_conventionnorUVCal.pol_conventionare specified, a a warning is raised (since the resulting calibrated data is not well-determined), and it is assumed that the solutions have the same convention as theUVData(i.e. the desired convention in the case of calibration, or the actual convention in the case of uncalibration). If these are also not specified, no convention corrections are applied, and the result is ambiguous.If both
uvc_pol_conventionandUVCal.pol_conventionare specified and are different, an error is raised.
When calibrating in
pyuvdata.utils.uvcalibrate()(i.e.undo=False):If
uvdata.pol_conventionis specified, an error is raised, because you are trying to calibrate already-calibrated data.The convention applied to the resulting
UVDataobject is inferred in the following precedence: (i) the value ofuvd_pol_convention, (ii) whatever is specified as the convention of theUVCalobject (either viauvc_pol_conventionorUVCal.pol_convention, see above), (iii) if still unspecified, no convention will be used and a warning will be raised. This was always the behavior in earlier versions ofpyuvdata(pre-v3).
When un-calibrating with
pyuvdata.utils.uvcalibrate()(i.e.undo=True):If both
uvd_pol_conventionanduvdata.pol_conventionare defined and are different, an error is raised.If neither are set, a warning is raised, since the resulting un-calibrated values may not be the same as the original values before calibration (since a different convention could have been used to calibrate originally than is being used to de-calibrate). However, calibration will continue, assuming that the
UVDataobject has the same convention as theUVCalobject used to de-calibrate.
It is not supported to have
pol_conventionset onUVCal, but notgain_scale. Apol_conventiononly makes sense in the context of having a scale for the gains.Mis-matching
uvd_pol_conventionanduvc_pol_conventionis perfectly fine: any necessary corrections in the calibration will be made to obtain the correct desired convention.
import numpy as np
from pyuvdata import utils, UVCal, UVData
from pyuvdata.datasets import fetch_data

vis_file = fetch_data("hera_uvcalibrate_uvh5")
cal_file = fetch_data("hera_uvcalibrate_calfits")
uvd = UVData.from_file(vis_file)
uvc = UVCal.from_file(cal_file)
# this is an old calfits file which has the wrong antenna names, so we need to fix them first.
# fix the antenna names in the uvcal object to match the uvdata object
uvc.telescope.antenna_names = np.array(
     [name.replace("ant", "HH") for name in uvc.telescope.antenna_names]
)
# We should also set the gain_scale and pol_convention, which was not set
# in this old file. In old HERA files, like this one, the pol_convention
# was implicitly "avg" but in new files it is explicitly "sum"
uvc.gain_scale = "Jy"
uvc.pol_convention = "avg"
uvd_calibrated = utils.uvcalibrate(uvd, uvc, inplace=False)

# We can also un-calibrate using the same UVCal
uvd_uncalibrated = utils.uvcalibrate(uvd_calibrated, uvc, inplace=False, undo=True)
UVCal: Selecting data
The pyuvdata.UVCal.select() method lets you select specific antennas
(by number or name), frequencies (in Hz or by channel number), times (either exact
times or times covered by a time range) or jones components (by number or string) to keep
in the object while removing others. By default, pyuvdata.UVCal.select() will
select data that matches the supplied criteria, but by setting invert=True, you
can instead deselect this data and preserve only that which does not match the
selection.
Note: The same select interface is now supported on the read for many file types (see UVCal: Working with large files), so you need not read in the entire file before doing the select.
a) Select antennas to keep on UVCal object using the antenna number.
from pyuvdata import UVCal
from pyuvdata.datasets import fetch_data

filename = fetch_data("hera_uvcalibrate_calfits")
uvc = UVCal.from_file(filename)
assert uvc.Nants_data == 8

uvc.select(antenna_nums=[0, 11, 12], invert=True)
assert uvc.Nants_data == 5

uvc.select(antenna_nums=[1, 13, 25])
assert uvc.Nants_data == 3
b) Select antennas to keep using the antenna names, also select frequencies to keep.
import numpy as np
from pyuvdata import UVCal
from pyuvdata.datasets import fetch_data

filename = fetch_data("hera_uvcalibrate_calfits")
uvc = UVCal.from_file(filename)
assert uvc.Nants_data == 8
assert uvc.Nfreqs == 64

uvc.select(antenna_names=['ant11', 'ant13', 'ant25'], freq_chans=np.arange(0, 4))
assert uvc.Nants_data == 3
assert uvc.Nfreqs == 4
d) Select times
from pyuvdata import UVCal
from pyuvdata.datasets import fetch_data

filename = fetch_data("hera_uvcalibrate_calfits")
uvc = UVCal.from_file(filename)
uvc2 = uvc.copy()
assert uvc.Ntimes == 10

# select the first 3 times
uvc.select(times=uvc.time_array[0:3])
assert uvc.Ntimes == 3

# Or select using a time range
uvc2.select(time_range=[2458098.4567, 2458098.4571])
assert uvc2.Ntimes == 3
d) Select Jones components
Selecting on Jones component can be done either using the component numbers or
the component strings (e.g. “Jxx” or “Jyy” for linear polarizations or “Jrr” or
“Jll” for circular polarizations). Under special circumstances, where x-polarization
feeds (as recorded in telescope.feed_array) are aligned to 0 or 90 degrees relative
to a line perpendicular to the horizon (as record in telescope.feed_angle) and/or
y-polarization are aligned to -90 or 0 degrees, strings representing the cardinal
orientation of the dipole can also be used (e.g. “Jnn” or “ee”).
from pyuvdata import utils, UVCal
from pyuvdata.datasets import fetch_data

filename = fetch_data("hera_uvcalibrate_calfits")
uvc = UVCal.from_file(filename)
assert uvc.jones_array.tolist() == [-5, -6]
assert utils.jnum2str(uvc.jones_array) == ['Jxx', 'Jyy']

# make a copy of the object and select Jones components using the component numbers
uvc2 = uvc.copy()
uvc2.select(jones=[-5])
assert uvc2.jones_array.tolist() == [-5]
assert utils.jnum2str(uvc2.jones_array) == ['Jxx']

# make a copy of the object and select Jones components using the component strings
uvc2 = uvc.copy()
uvc2.select(jones=["Jxx"])
assert uvc2.jones_array.tolist() == [-5]
assert utils.jnum2str(uvc2.jones_array) == ['Jxx']

# print x_orientation
assert uvc2.telescope.get_x_orientation_from_feeds() == "east"

# make a copy of the object and select Jones components using the physical orientation strings
uvc2 = uvc.copy()
uvc2.select(jones=["Jee"])
assert uvc2.jones_array.tolist() == [-5]
assert utils.jnum2str(uvc2.jones_array) == ['Jxx']
UVCal: Sorting data along various axes
Methods exist for sorting data along all the data axes to support comparisons between UVCal objects and software access patterns.
a) Sorting along the antenna axis
The pyuvdata.UVCal.reorder_antennas() method will reorder the antenna axis by
sorting by antenna names or numbers, in ascending or descending order, or in an order
specified by passing an index array.
import numpy as np
from pyuvdata import UVCal
from pyuvdata.datasets import fetch_data

filename = fetch_data("hera_omnical2")
uvc = UVCal.from_file(filename)
# Default is to order by antenna number
uvc.reorder_antennas()
assert np.all(np.diff(uvc.ant_array) >= 0)

# Prepend a ``-`` to the sort string to sort in descending order.
uvc.reorder_antennas("-number")
assert np.all(np.diff(uvc.ant_array) <= 0)
b) Sorting along the frequency axis
The pyuvdata.UVCal.reorder_freqs() method will reorder the frequency axis by
sorting by spectral windows or channels (or even just the channels within specific
spectral windows). Spectral windows or channels can be sorted by ascending or descending
number or in an order specified by passing an index array for spectral window or
channels.
import numpy as np
from pyuvdata import UVCal
from pyuvdata.datasets import fetch_data

filename = fetch_data("hera_omnical2")
uvc = UVCal.from_file(filename)
# First create a multi-spectral window UVCal object:
uvc.Nspws = 2
uvc.flex_spw_id_array = np.concatenate((np.ones(uvc.Nfreqs // 2, dtype=int), np.full(uvc.Nfreqs // 2, 2, dtype=int)))
uvc.spw_array = np.array([1, 2])
spw2_inds = np.nonzero(uvc.flex_spw_id_array == 2)[0]
spw2_chan_width = uvc.channel_width[0] * 2
uvc.freq_array[spw2_inds] = uvc.freq_array[spw2_inds[0]] + spw2_chan_width * np.arange(spw2_inds.size)
uvc.channel_width[spw2_inds] = spw2_chan_width

# Sort by spectral window number and by frequency within the spectral window
# Now the spectral windows are in ascending order and the frequencies in each window
# are in ascending order.
uvc.reorder_freqs(spw_order="number", channel_order="freq")
assert uvc.spw_array.tolist() == [1, 2]
assert np.all(np.diff(uvc.freq_array[np.nonzero(uvc.flex_spw_id_array == 1)]) >= 0)

# Prepend a ``-`` to the sort string to sort in descending order.
# Now the spectral windows are in descending order but the frequencies in each window
# are in ascending order.
uvc.reorder_freqs(spw_order="-number", channel_order="freq")
assert uvc.spw_array.tolist() == [2, 1]
assert np.all(np.diff(uvc.freq_array[np.nonzero(uvc.flex_spw_id_array == 1)]) >= 0)

# Use the ``select_spw`` keyword to sort only one spectral window.
# Now the frequencies in spectral window 1 are in descending order but the frequencies
# in spectral window 2 are in ascending order
uvc.reorder_freqs(select_spw=1, channel_order="-freq")
assert np.all(np.diff(uvc.freq_array[np.nonzero(uvc.flex_spw_id_array == 1)]) <= 0)
assert np.all(np.diff(uvc.freq_array[np.nonzero(uvc.flex_spw_id_array == 2)]) >= 0)
c) Sorting along the time axis
The pyuvdata.UVCal.reorder_times() method will reorder the time axis by
sorting by time (ascending or descending) or in an order specified by passing an index
array for the time axis.
import numpy as np
from pyuvdata import UVCal
from pyuvdata.datasets import fetch_data

filename = fetch_data("hera_omnical2")
uvc = UVCal.from_file(filename)

# Default is to order by ascending time
uvc.reorder_times()
assert np.all(np.diff(uvc.time_array) >= 0)

# Prepend a ``-`` to the sort string to sort in descending order.
uvc.reorder_times("-time")
assert np.all(np.diff(uvc.time_array) <= 0)
d) Sorting along the Jones component axis
The pyuvdata.UVCal.reorder_jones() method will reorder the Jones component axis
by the Jones component number or name, or by an explicit index ordering set by the user.
from pyuvdata import UVCal
from pyuvdata.datasets import fetch_data

filename = fetch_data("hera_uvcalibrate_calfits")
uvc = UVCal.from_file(filename)
# Default is to order by Jones component name
uvc.reorder_jones()
assert uvc.jones_array.tolist() == [-5, -6]
UVCal: Combining and concatenating data
The __add__() method lets you combine UVCal objects along
the antenna, time, frequency, and/or polarization axis.
a) Add frequencies.
import numpy as np
from pyuvdata import UVCal
from pyuvdata.datasets import fetch_data

filename = fetch_data("hera_omnical2")
uvc1 = UVCal.from_file(filename)
uvc2 = uvc1.copy()

# Downselect frequencies to recombine
uvc1.select(freq_chans=np.arange(0, 5))
assert uvc1.Nfreqs == 5
uvc2.select(freq_chans=np.arange(5, 10))
assert uvc2.Nfreqs == 5
uvc3 = uvc1 + uvc2
assert uvc3.Nfreqs == 10
b) Add times.
import numpy as np
from pyuvdata import UVCal
from pyuvdata.datasets import fetch_data

filename = fetch_data("hera_omnical2")
uvc1 = UVCal.from_file(filename)
uvc2 = uvc1.copy()

# Downselect times to recombine
times = np.unique(uvc1.time_array)
uvc1.select(times=times[0:len(times) // 2])
assert uvc1.Ntimes == 2
uvc2.select(times=times[len(times) // 2:])
assert uvc2.Ntimes == 3
uvc3 = uvc1 + uvc2
assert uvc3.Ntimes == 5
c) Adding in place.
The following two commands are equivalent, and act on uvc1 directly without creating a third uvcal object.
import numpy as np
from pyuvdata import UVCal
from pyuvdata.datasets import fetch_data

filename = fetch_data("hera_omnical2")
uvc1 = UVCal.from_file(filename)
uvc2 = uvc1.copy()
times = np.unique(uvc1.time_array)
uvc1.select(times=times[0:len(times) // 2])
uvc2.select(times=times[len(times) // 2:])
uvc1.__add__(uvc2, inplace=True)

uvc1.read(filename)
uvc2 = uvc1.copy()
uvc1.select(times=times[0:len(times) // 2])
uvc2.select(times=times[len(times) // 2:])
uvc1 += uvc2
d) Reading multiple files.
If you pass a list of files to the read or from_file methods (pyuvdata.UVCal.read(),
pyuvdata.UVCal.from_file()), each file will be read in succession and combined
with the previous file(s).
import os
import numpy as np
from pyuvdata import UVCal
from pyuvdata.datasets import fetch_data

filename = fetch_data("hera_omnical2")
uvc = UVCal.from_file(filename)
uvc1 = uvc.select(freq_chans=np.arange(0, 2), inplace=False)
uvc2 = uvc.select(freq_chans=np.arange(2, 4), inplace=False)
uvc3 = uvc.select(freq_chans=np.arange(4, 7), inplace=False)
uvc1.write_calfits(os.path.join(".", "tutorial1.fits"))
uvc2.write_calfits(os.path.join(".", "tutorial2.fits"))
uvc3.write_calfits(os.path.join(".", "tutorial3.fits"))
filenames = [
    os.path.join(".", f) for f in ["tutorial1.fits", "tutorial2.fits", "tutorial3.fits"]
]
uvc.read(filenames)

# For FHD cal datasets pass lists for each file type
fhd_path = fetch_data("mwa_fhd_cal")
obs_testfiles = [
    os.path.join(fhd_path, "metadata/1061316296_obs.sav"),
    os.path.join(fhd_path, "set2/1061316296_obs.sav"),
]
cal_testfiles = [
    os.path.join(fhd_path, "calibration/1061316296_cal.sav"),
    os.path.join(fhd_path, "set2/1061316296_cal.sav"),
]
settings_testfiles = [
    os.path.join(fhd_path, "metadata/1061316296_settings.txt"),
    os.path.join(fhd_path, "set2/1061316296_settings.txt"),
]
layout_testfiles = [
    os.path.join(fhd_path, "metadata/1061316296_layout.sav"),
    os.path.join(fhd_path, "metadata/1061316296_layout.sav"),
]
fhd_uvc = UVCal.from_file(
    cal_testfiles,
    obs_file=obs_testfiles,
    settings_file=settings_testfiles,
    layout_file=layout_testfiles,
)
e) Fast concatenation
As an alternative to the pyuvdata.UVCal.__add__() method,
the pyuvdata.UVCal.fast_concat() method can be used.
The user specifies a UVCal object to combine with the existing one,
along with the axis along which they should be combined. Fast concatenation can
be invoked implicitly when reading in multiple files as above by passing the
axis keyword argument. This will use the fast_concat method instead of
the __add__ method to combine the data contained in the files into a single
UVCal object.
Warning
There is no guarantee that two objects combined in this fashion will result in a self-consistent object after concatenation. Basic checking is done, but time-consuming robust checks are eschewed for the sake of speed. The data will also not be reordered or sorted as part of the concatenation, and so this must be done manually by the user if a reordering is desired (see UVCal: Sorting data along various axes).
import os
import numpy as np
from pyuvdata import UVCal
from pyuvdata.datasets import fetch_data

filename = fetch_data("hera_omnical2")
uvc = UVCal.from_file(filename)
uvc1 = uvc.select(freq_chans=np.arange(0, 2), inplace=False)
uvc2 = uvc.select(freq_chans=np.arange(2, 4), inplace=False)
uvc3 = uvc.select(freq_chans=np.arange(4, 7), inplace=False)
uvc1.write_calfits(os.path.join(".", "tutorial1.fits"), clobber=True)
uvc2.write_calfits(os.path.join(".", "tutorial2.fits"), clobber=True)
uvc3.write_calfits(os.path.join(".", "tutorial3.fits"), clobber=True)
filenames = [
    os.path.join(".", f) for f in ["tutorial1.fits", "tutorial2.fits", "tutorial3.fits"]
]
uvc.read(filenames, axis="freq")
UVCal: Working with large files
To save on memory and time, pyuvdata supports reading only parts of CalH5 and CalFITS files.
Note that select on read (partial reading) is not always faster than reading an entire file and then downselecting. Which approach is faster depends on the fraction of data that is selected as well on the relationship between the selection and the internal data ordering in the file. When the select is on a small area of the file or has a regular stride it can be much faster to do the select on read, but in other cases it can be slower. Select on read does generally reduce the memory footprint.
a) Reading just the metadata of a file
For CalH5, CalFITS and FHD files, reading in the only the metadata results in a metadata only UVCal object (which has every attribute except the gain or delay arrays, quality arrays and flag arrays filled out).
Measurement set (ms) files do not support reading only the metadata (the read_data keyword is ignored for ms files).
from pyuvdata import UVCal
from pyuvdata.datasets import fetch_data

filename = fetch_data("hera_omnical2")

# read the metadata but not the data
uvc = UVCal.from_file(filename, read_data=False)
assert uvc.metadata_only
assert uvc.time_array.size == 5
assert uvc.gain_array is None
b) Reading only parts of files
The same options that are available for the pyuvdata.UVCal.select() method can
also be passed to the pyuvdata.UVCal.read() method to do the select on the read,
saving memory and time if only a portion of the data are needed.
Note that these keywords can be used for any file type, but for FHD and measurement set (ms) files, the select is done after the read, which does not save memory.
import numpy as np
from pyuvdata import UVCal
from pyuvdata.datasets import fetch_data

filename = fetch_data("hera_omnical2")
uvc = UVCal.from_file(filename, freq_chans=np.arange(7))
assert uvc.Nfreqs == 7

# Reading in the metadata can help with specifying what data to read in
uvc = UVCal.from_file(filename, read_data=False)
assert uvc.Ntimes == 5

uvc = UVCal.from_file(filename, times=uvc.time_array[[0, 2]])
assert uvc.Ntimes == 2
UVCal: Changing cal_type from “delay” to “gain”
UVCal includes the method pyuvdata.UVCal.convert_to_gain(), which changes a
UVCal object’s cal_type parameter from “delay” to “gain”, and accordingly sets the
object’s gain_array to an array consistent with its pre-existing delay_array.
import numpy as np
from pyuvdata import UVCal
from pyuvdata.datasets import fetch_data

# This file has a cal_type of "delay".
filename = fetch_data("hera_firstcal_delay")
uvc = UVCal.from_file(filename)
assert uvc.cal_type == "delay"

# But we can convert it to a "gain" type calibration.
channel_width = 1e8 # 1 MHz
n_freqs = (uvc.freq_range[0, 1] - uvc.freq_range[0, 0]) / channel_width
freq_array = np.arange(n_freqs) * channel_width + uvc.freq_range[0]
channel_width = np.full(freq_array.size, channel_width, dtype=float) # 1 MHz
uvc.convert_to_gain(freq_array=freq_array, channel_width=channel_width)
assert uvc.cal_type == "gain"

# If we want the calibration to use a positive value in its exponent, rather
# than the default negative value:
uvc = UVCal.from_file(filename)
uvc.convert_to_gain(delay_convention="plus", freq_array=freq_array, channel_width=channel_width)

# Convert to gain *without* running the default check that internal arrays are
# of compatible shapes:
uvc.read(filename)
uvc.convert_to_gain(freq_array=freq_array, channel_width=channel_width, run_check=False)

# Convert to gain *without* running the default check that optional parameters
# are properly shaped and typed:
uvc.read(filename)
uvc.convert_to_gain(freq_array=freq_array, channel_width=channel_width, check_extra=False)

# Convert to gain *without* running the default checks on the reasonableness
# of the resulting calibration's parameters.
uvc.read(filename)
uvc.convert_to_gain(freq_array=freq_array, channel_width=channel_width, run_check_acceptability=False)
UVCal: Instantiating from arrays in memory
pyuvdata can also be used to create a UVCal object from arrays in memory. This
is useful for mocking up data for testing or for creating a UVCal object from
simulated data. Instead of instantiating a blank object and setting each required
parameter, you can use the .new() static method, which deals with the task
of creating a consistent object from a minimal set of inputs
from astropy.coordinates import EarthLocation
import numpy as np
from pyuvdata import Telescope, UVCal

uvc = UVCal.new(
     gain_convention = "multiply",
     cal_style = "redundant",
     freq_array = np.linspace(1e8, 2e8, 100),
     jones_array = ["ee", "nn"],
     telescope = Telescope.new(
         antenna_positions = {
             0: [0.0, 0.0, 0.0],
             1: [0.0, 0.0, 1.0],
             2: [0.0, 0.0, 2.0],
         },
         location = EarthLocation.from_geodetic(0, 0, 0),
         name = "test",
         x_orientation = "east",
         mount_type = "fixed",
     ),
     time_array = np.linspace(2459855, 2459856, 20),
)
Notice that you need only provide the required parameters, and the rest will be filled in with sensible defaults. The telescope related metadata is passed directly to a simple Telescope constructor which also only requires the minimal set of inputs but can accept any other parameters supported by the class.
See the full documentation for the method
pyuvdata.UVCal.UVCal.new() for more information.
UVCal: Initializing from a UVData object
The pyuvdata.UVCal.initialize_from_uvdata() method allows you to initialize
a UVCal object from the metadata in a UVData object. This is useful for codes
that are calculating calibration solutions from UVData objects. There are many
optional parameters to allow users to specify additional metadata or changes
from the uvdata metadata. By default, this method creates a metadata only UVCal
object, but it can optionally create the data-like arrays as well, filled with zeros.
from pyuvdata import UVCal, UVData
from pyuvdata.datasets import fetch_data

vis_file = fetch_data("hera_uvcalibrate_uvh5")
uvd = UVData.from_file(vis_file, file_type="uvh5")
uvc = UVCal.initialize_from_uvdata(uvd, gain_convention="multiply", cal_style="redundant")